Throughout the construction of this page, I thought it would be very helpful to record the creation of this page for future references. This tutorial will also be used to teach students within the CCNY ACM how to build their own personal portfolios. If you would like to build your own portfolio, continue reading!
What is Jekyll?
Jekyll is a simple, static site generator. It uses a template directory which contains raw text files in various formats (either markdown or html), and runs it through Markdown (or textile) and Liquid converters, and outputs a static website ready to be served. Jekyll is also the engine behind Github Pages, and in this tutorial I will be demonstrating how to host your portfolio using github pages.
Installing Jekyll
In order to start, first you’ll need to install jekyll via Ruby Gems. To install Jekyll, simply type into your terminal: gem install jekyll. To test a working configuation of Jekyll, perform the following steps:
~ $ gem install jekyll
~ $ jekyll new myblog
~ $ cd myblog
~/myblog $ jekyll serve
# => Browse page at http://0.0.0.0:4000
If you were successful in serving up that page, then we’re ready to move onto the next step.
Skills/Tools required
In order to go through this tutorial, you’ll need to have the following skills/tools:
- Basic HTML/CSS/JS skills
- A Github account as well as the ability to clone a repository
- Understanding of your terminal and how to use it for creating/moving files around
Project Structure
At the end of this tutorial, your project directory structure should look like the following:
    portfolio/
├── _config.yml
├── _layouts
│   ├── default.html
│   └── portfolio_entry.html
├── _posts
│   └── 2014-10-10-firstproject.md
├── _site
│   ├── 2014
│   │   └── 10
│   │       └── 10
│   │           └── firstproject.html
│   ├── about
│   │   └── index.html
│   ├── blog
│   │   └── index.html
│   ├── contact
│   │   └── index.html
│   ├── css
│   │   ├── images
│   │   │   ├── bx_loader.gif
│   │   │   └── controls.png
│   │   ├── jquery.bxslider.css
│   │   ├── pygment_trac.css
│   │   └── style.css
│   ├── img
│   │   ├── banners
│   │   │   └── banner1.png
│   │   └── folder1
│   │       ├── image1.png
│   │       └── image2.png
│   ├── index.html
│   ├── js
│   │   ├── jquery.bxslider.js
│   │   ├── jquery.bxslider.min.js
│   │   └── scale.fix.js
│   └── portfolio
│       └── index.html
├── about
│   └── index.html
├── blog
│   └── index.html
├── contact
│   └── index.html
├── css
│   ├── images
│   │   ├── bx_loader.gif
│   │   └── controls.png
│   ├── jquery.bxslider.css
│   ├── pygment_trac.css
│   └── style.css
├── img
│   ├── banners
│   │   └── banner1.png
│   └── folder1
│       ├── image1.png
│       └── image2.png
├── index.html
├── js
│   ├── jquery.bxslider.js
│   ├── jquery.bxslider.min.js
│   └── scale.fix.js
└── portfolio
    └── index.html
To clone a repository containing the final product, you can do so here.
Building your own portfolio
Now that we have jekyll up and running, we are ready to start our portfolio. Starting out, first navigate to a directory where you would like to store your files. For the sake of this tutorial, I’ll be working within the documents subfolder.
~ $ cd Documents
~ $ mkdir portfolio
~ $ cd portfolio
Creating _config.yml
Jekyll uses a _config.yml file for setting up configurations that will be used across your site. For the sake of this tutorial, we will simply create _config.yml as shown below:
~/portfolio $ vim _config.yml Inside of this file we will simply put in:
markdown: kramdownThe reason for this is that the Maruku interpreter for Markdown has been deprecated, so we now use the kramdown interpreter.
Choosing a Jekyll Theme
In this tutorial, I’ll be using the minimalistic theme. To put get it up and running, do the following:
~/portfolio $ mkdir js
~/portfolio $ mkdir css
Now we create a javascript file called scale.fix.js.
~/portfolio/js $ vim scale.fix.js
var metas = document.getElementsByTagName('meta');
var i;
if (navigator.userAgent.match(/iPhone/i)) {
  for (i=0; i<metas.length; i++) {
    if (metas[i].name == "viewport") {
      metas[i].content = "width=device-width, minimum-scale=1.0, maximum-scale=1.0";
    }
  }
  document.addEventListener("gesturestart", gestureStart, false);
}
function gestureStart() {
  for (i=0; i<metas.length; i++) {
    if (metas[i].name == "viewport") {
      metas[i].content = "width=device-width, minimum-scale=0.25, maximum-scale=1.6";
    }
  }
}
Now we create a css file named style.css:
~/portfolio/css $ vim style.cssInside of style.css, grab the code from here
and copy it into that file.
We need one more CSS file for our theme, pygment_trac.css. Let’s create it:
~/portfolio/css $ vim pygment_trac.cssAs for the source code itself, you can grab it here.
Now that we have applied a new theme to our site, it’s time to start with some content.
Building our first template
Jekyll uses Templates, which are parsed and can be reused in multiple pages. We first start off with a default template, default.html.
~/portfolio/ $ mkdir _layouts
~/portfolio/ $ cd _layouts
~/portfolio/_layouts $ vim default.html
Within our new default.html file, we write the following code:
<!DOCTYPE html>
<html>
<head>
<meta charset=utf-8 />
<title> Jekyll Portfolio Tutorial | David Leonard</title>
<link rel="stylesheet" href="/css/style.css" />
<link rel="stylesheet" href="/css/pygment_trac.css">
<link rel="stylesheet" href="/css/jquery.bxslider.css" />
<script src="http://ajax.googleapis.com/ajax/libs/jquery/1.8.3/jquery.min.js"></script>
<script src="http://ajax.googleapis.com/ajax/libs/jqueryui/1.9.1/jquery-ui.min.js"></script>
<script src="/js/jquery.bxslider.min.js"></script>
</head>
<body>
<div class="wrapper">
<header>
<nav role="navigation">
<ul>
<li><a href=" "> About </a></li>
<li><a href=" "> Projects </a></li>
<li><a href=" "> Blog </a></li>
<li><a href=" "> Contact </a></li>
</ul>
</nav>
</header>
{{ content }}
<footer>
<p>
<small>©2014 Name Here </small><br />
<small>Made with <a href="http://jekyllrb.com/">Jekyll</a> — Theme by <a href="https://github.com/orderedlist">orderedlist</a></small>
</p>
</footer>
</div>
<body>
<script src="/js/scale.fix.js"></script>
</body>
</body>
</html>Between lines 1-4, we define a section which will be parsed by the markdown interpreter. All files will begin with this same format, each containing a layout and a title, where layout here references our default.html template we created earlier, and title can be an arbitrary name, which will be reflected at the top of your browser. At this point, we have created our first page which we can navigate to!
As you’ve probably noticed in the head of the above file, we included some css/js files that we haven’t created yet. These are for using the image carousels, which we will create soon. For now, let’s gather the necessary files.
~/portfolio/css $ vim jquery.bxslider.cssThe source code for jquery.bxslider.css is located here.
Now for the JavaScript files:
~/portfolio/js $ vim jquery.bxslider.min.jsThe source code for jquery.bxslider.min.js is located here.
With that, we have all the css/js files needed for the future.
Creating our home page
To host our webpage on github pages, we’ll need to create an index.html file within the root directory.
~/portfolio $ vim index.htmlWithin our new index.html file, we place the following (duplicated code from the about page, except there is no title):
---
layout: default
---

<div class="wrapper">
    <section>
        <h1> About Me </h1>
        <hr>
        <p> Your stuff here. </p>

        <p> More stuff here. </p>

    </section>

</div>
If you go into your root directory and perform the following steps:
~/portfolio $ jekyll serve --watch
~/portfolio $ #=> Go to page to see
You can now see your layout and new webpage! Currently, the about, contact, projects and blog links to the left don’t do anything. Let’s get started with adding content!
Creating our first page
After creating our first template, we can now build our first page. Each page of our webpage will be inside its own folder, each with its own index.html file within it. Let’s start with an about page:
~/portfolio $ mkdir about
~/portfolio $ cd about
~/portfolio/about $ vim index.html
Within our index.html page, we place the following code inside of it:
---
layout: default
title: About
---

<div class="wrapper">
    <section>
        <h1> About Me </h1>
        <hr>
        <p> Your stuff here. </p>

        <p> More stuff here. </p>

    </section>

</div>
To navigate to your about page, make the following change to _layouts/default.html:
<nav role="navigation">
        <ul>
            <li><a href="/about/"> About </a></li>
            <li><a href=" "> Projects </a></li>
            <li><a href=" "> Blog </a></li>
            <li><a href=" "> Contact </a></li>
        </ul>
</nav>
When you navigate to your about page, you’ll see the following content shown below. We now move onto creating a projects page.
Creating a portfolio page
As mentioned earlier within this tutorial, each page of our webpage will live within its own folder along with a corresponding index.html file. To begin:
~/portfolio $ mkdir portfolio
~/portfolio $ cd portfolio
~/portfolio $ vim index.html
Within portfolio/portfolio/index.html, we place the following code:
---
layout: default
title: Portfolio
---

<body>
    <div class="wrapper">

        <section>
            <h1>Project Portfolio</h1>
            <h2>Project 1</a></h2>

            <p>Project 1 Description</p>

        </section>
    </div>
</body>
We must also link our new projects page. To do this, make the following change inside of _layouts/default.html:
<nav role="navigation">
        <ul>
            <li><a href="/about/"> About </a></li>
            <li><a href="/portfolio/"> Projects </a></li>
            <li><a href=" "> Blog </a></li>
            <li><a href=" "> Contact </a></li>
        </ul>
</nav>
With this, we have listed our first project! Let’s make it a little more fancy by adding an image carousel on top of each project. To do this, we will be using a jQuery plugin named bxSlider. By requiring the necessary css and js files within our default.html template, all we need to add is the following to our portfolio/portfolio/index.html:
<head>
    <script type="text/javascript">
        $(document).ready(function() {
            $('#slider1').bxSlider({
                auto: true,
                pager: true,
                slideWidth: 800,
                captions: true
            });
        });
    </script>
</head>
And within the body of our page, we place the following code:
<ul id="slider1">
  <li><img src="/img/folder-name/image-name.png" title="First image caption" /></li>
  <li><img src="/img/folder-name/image-name.png" title="Second image caption" /></li>
</ul>
This is all that is needed to get an image carousel working! All that is left is to add the images into the designated folder path.
~/portfolio $ mkdir img
~/portfolio $ cd img
~/portfolio/img $ mkdir folder-name
~/portfolio/img/folder-name $ #=> Place images with the same name for the carousel in here
And now your first carousel should show the images you placed within the portfolio/img/technetium folder!
To create new carousels, inside of the head section in your portfolio/portfolio/index.html file, you can create a new carousel like this:
<head>
    <script type="text/javascript">
    $(document).ready(function() {
            $('#slider1').bxSlider({
                auto: true,
                pager: true,
                slideWidth: 800,
                captions: true
            });

            $('#slider2').bxSlider({
                auto: true,
                pager: true,
                slideWidth: 800,
                captions: true
            });

            <!-- Add more carousels as needed -->
    });
    </script>
Notice how each new carousel begins with $('#slider(number)'). To create new carousels, simply switch the number to a new one. These numbers refer to the div id, which allows us to manipulate the content within it.
Likewise, after initializing a new carousel, we need to actually place the content in it as such:
<ul id="slider2">
  <li><img src="/img/folder-name/image1.png" title="First image" /></li>
  <li><img src="/img/folder-name/image2.png" title="Second image" /></li>
</ul>
Where we also create a subfolder inside of img which will hold some new images for our new carousel.
Putting it all together, here is our final portfolio/portfolio/index.html:
---
layout: default
title: Portfolio
---
<head>

    <script type="text/javascript">
        $(document).ready(function() {
            $('#slider1').bxSlider({
                auto: true,
                pager: true,
                slideWidth: 800,
                captions: true
            });
        });
    </script>
</head>

<body>
    <div class="wrapper">

        <section>
            <h1>Project Portfolio</h1>
            <h2>Project 1</a></h2>

            <ul id="slider1">
              <li><img src="/img/folder-name/image-name.png" title="First image caption" /></li>
              <li><img src="/img/folder-name/image-name.png" title="Second image caption" /></li>
            </ul>

            <p>Add paragraphs for project description here.</p>

        </section>
    </div>
</body>
That concludes our portfolio page! It is easy to extend this page and add as many projects to it as you like, along with image carousels. The next page we will tackle is our blog.
Creating our blog page
We now move onto what Jekyll was actually designed for: a blog. Even if you don’t like to write about technical things, you can still use this page to link to more detailed descriptions of your projects. These descriptions can vary from features, to challenges faced and experiences learned, and you can even include code snippets! These posts are great ways to show anyone who visits your page (from recruiters to friends) that you know what you are talking about, and can think critically about your project organization.
Let’s begin.
~/portfolio $ mkdir blog
~/portfolio $ cd blog
~/portfolio $ vim index.html
Within blog/index.html, we place the following code:
---
layout: default
title: Blog
---

<div class="wrapper">
    <section>
        {% for post in site.posts %}
            <h2 class="post-title"><a href="{{ post.url }}">{{ post.title }}</a></h2>
            <p class="post-meta">
                {{ post.date | date_to_string }}
            </p>

            {% if post.image %}
            <a href="{{ post.url }}">
            <img src="{{ post.image }}" alt="{{ post.title }}" />
            </a>
            {% endif %}

            <p class="post-excerpt">{{ post.excerpt | strip_html }} [<a style="color:#1faa9b" href="{{ post.url }}">read more</a>]</p>

        {% endfor %}

    </section>
</div>
The above code loops over all files within the posts subfolder within the _site folder. The _site folder is automatically generated when running jekyll serve --watch, and we never interact with it. Also, each post will have a date which is parsed and displayed, and if an image attribute is defined, then it will display the image as a banner. Lastly, the last lines in the above code will take the first paragraph of your post and display it, along with a read more link that will take the user to the full post. Very powerful stuff.
To make the blog link available, make the following change to _layouts/default.html:
<nav role="navigation">
        <ul>
            <li><a href="/about/"> About </a></li>
            <li><a href="/portfolio/"> Projects </a></li>
            <li><a href="/blog/"> Blog </a></li>
            <li><a href=" "> Contact </a></li>
        </ul>
</nav>
Currently, there are no posts. Before we create a post, we’ll need to create a new template within our _layouts folder to render our posts. Let’s create a new template portfolio_entry.html within the _layouts folder:
~/portfolio/_layouts $ vim portfolio_entry.html---
layout: default
---
<div class="wrapper">
<section>
<h2 class="content">{{page.title}}</h2>
<p class="post-meta">
{{ page.date | date_to_string }}
</p>
<img src="{{ page.image }}" />
{{ content }}
</section>
</div>This template will render the contents of all our posts. It will grab the title of the post, as well as the date, image and content and render it on the page.
Creating your first post
Jekyll uses markdown when creating posts, which is parsed and displayed. All of our blog posts will live within a _posts folder. Let’s create that now:
~/portfolio $ mkdir _posts
~/portfolio $ cd _posts
~/portfolio/_posts $ vim 2014-10-10-firstproject.md
Within _posts/2014-10-10-firstproject.md, we place the following:
---
layout: portfolio_entry
title: First Project
image: /img/folder-name/image-name.png
---

Post excerpt goes here. The first paragraph will be shown only, along with a read more button which links to the full post. Perfect for placing project descriptions or to actually blog about something!

#### Header 1

Content Here.

More Content.
With this, we now have our blog page set! To create more posts, simply create more markdown files with the format: YYYY-MM-DD-name.md within the _posts folder. With our blog/index.html file, it will automatically populate our blog page with all blog posts due to the for loop which iterates over every post we have!
We now move onto our last page, the contact page.
Creating a contact page
As we already know from all the previous steps, we need to create a new folder called contact and within, we create an index.html file. To begin:
~/portfolio $ mkdir contact
~/portfolio $ cd contact
~/portfolio $ vim index.html
Within contact/index.html, we place the following code:
---
layout: default
title: Contact
---

<div class="wrapper">
    <section>
        <h1>Contact Me</h1>
        <p> Your content here. </p>

        <p> Even more content. </p>
    </section>
</div>
And to navigate to the contact page, we make the following change to _layouts/default.html:
<nav role="navigation">
        <ul>
            <li><a href="/about/"> About </a></li>
            <li><a href="/portfolio/"> Projects </a></li>
            <li><a href="/blog/"> Blog </a></li>
            <li><a href="/contact/"> Contact </a></li>
        </ul>
</nav>
And that concludes all of the pages! We have successfully created a full personal webpage. All that is left is to add your own contact, links and whatever else you like! We now move onto deploying our web page on github pages.
Deploying your webpage
After coming this far, we are ready to deploy our new portfolio. To do so, you’ll first have to create an account on Github, it is free to join. We then want to create a new repository by clicking the top right plus sign, and click create new repository. You’ll then be taken to this page:
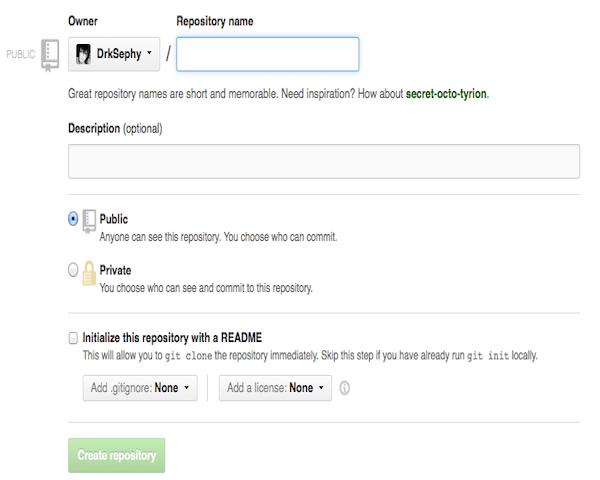
Within the repository name field, provide the name using the format: accountname.github.io. This will allow Github to know that this page should be served. After creating this repository, you’ll need to clone it. Navigate to your repository, and clone it by copying the link shown in the red box below:
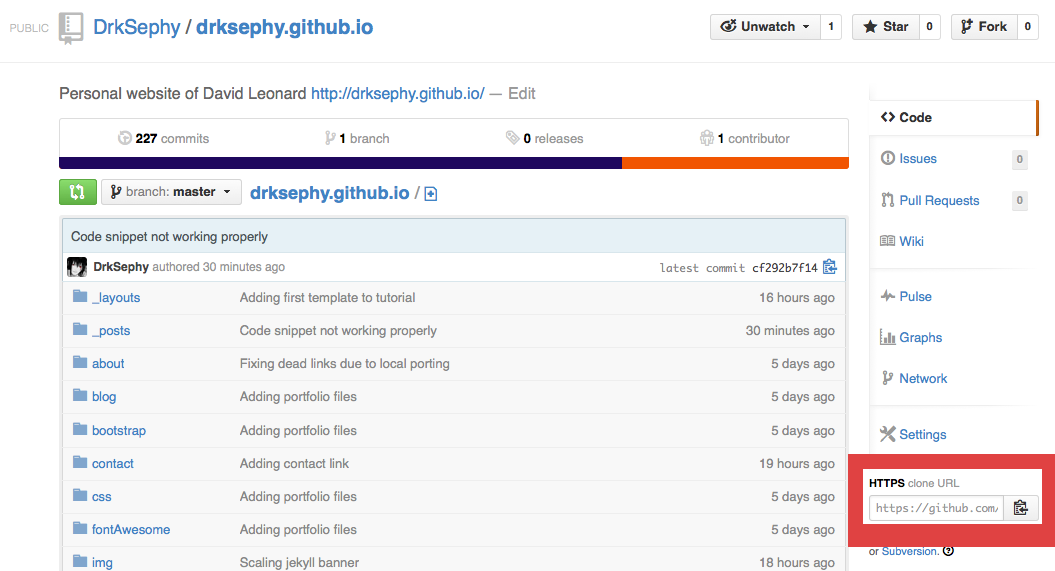
Copy the link, and inside of your terminal:
~/Documents $ git clone urlWhere url is the one copied to your clipboard.
After cloning your repository, you’ll need to copy all of your files from your portfolio folder and put it into your new cloned repository. Simply copy every file inside of portfolio/ and paste it into your_new_repo_folder. To do this, you can do the following in your terminal:
~/Documents/ $ cp -r portfolio/ cloned_repo_folder/The above bash command will copy all files within portfolio/ into your cloned_repo_folder/. Now, we simply perform the following steps:
~/Documents/cloned_repo_folder/ $ git add .
~/Documents/cloned_repo_folder/ $ git commit -m "Adding my new portfolio files"
~/Documents/cloned_repo_folder/ $ git push origin master
This will push up all of your files for your new repository. It takes a few minutes to take effect, but you can visit your new web page at accountname.github.io! I hope this tutorial was helpful for anyone who attempts to use it. Enjoy your new personal web page!