What are we building?
In this tutorial, we will be building a Django application from the ground up which will allow the user to query Github data through the use of a form. To build our application, we’ll be using a wide array of technologies. We’ll use pip for Python package dependency management, bower for front-end dependency management, Twitter Bootstrap for design, Requests for making HTTP requests, the Github API as our data source, and of course, Django.
This tutorial assumes very little, so we’ll cover the following concepts throughout:
- Model, View, Controllers (MVC)
- JavaScript Object Notation (JSON)
- RESTful APIs
- Application flow within Django applications
The complete source for this project can be found here.
Application Flow
The behavior of any Django Application (or web frameworks, in general) can be broken down as follows:
- The user visits a URL, such as
/amazon/games - This triggers a request to that URL, which is looked up in our URL dispatcher
- The URL dispatcher will map this URL to a function within our Views
- The corresponding View function will then access models, perform queries or fetch data as needed, which is bundled up and passed into a template
- The data passed into the template is then displayed to the user using HTML
By following this flow, it becomes easier to reason about our applications even when they begin to grow larger and larger.
Models, Views, Controllers
The core structure of any web framework can be broken into three parts: the Models, Views, and Controllers. This pattern allows developers to have a separation of concerns when building an application, and allows us to impose a logical structure to our projects. Let’s go over these parts in more detail.
Models
Within a web framework, Models are your data layer. At any given time, your models will represent what your objects in your database will look like. For example, take a look at the following Django model shown below:
from django.db import models

class Student(models.Model):
    first_name = models.CharField(max_length=30)
    last_name = models.CharField(max_length=30)
    age = models.IntegerField()
Where first_name, last_name and age will be fields in each Student object. Django provides easy to use validation methods through CharField, IntegerField and much more, allowing model fields to only accept certain inputs.
Under the hood, Django will use these models to create Structured Query Language, which in turn will store these models into a SQL database (MySQL, SQLite3, PostgreSQL). Using these methods, we won’t have to write our own database logic using SQL.
Views
A view is typically a visual representation of our underlying data layer (models). Views can update models as well as retrieve data from them through a query, which in turn would be passed to an HTML template.
In Django, views generally consist of a combination of templates, the URL dispatcher, and a views.py file. When a user navigates to a URL, a callback function is run which maps that particular url (such as /games) to a method named games within views.py which may in turn query models or some external API, and finally pass that data to a template using methods such as
render.
Controllers
In Django, controllers are generally described as the underlying mechanisms of the framework itself which sends web requests to the appropriate view in combination with the URL dispatcher. In a sense, Django is more of a “Model, Template, View” framework as there are no explicit “Controllers”.
RESTful APIs
Without getting too deep into the meaning of “RESTful API”, this term essentially means that there exists a web service which understands HTTP requests (GET, PUT/UPDATE, CREATE, DELETE). Any program that can send a web request (such as a Python program using the Requests library) can interact with these web service and receive data back in the form of either JSON or XML. This application will make use of the Requests library to send HTTP GET requests to Github’s RESTful API which in turn will return JSON, which we will parse and render through an HTML template.
JSON
JavaScript Object Notation (JSON) is a way to store information in a lightweight, organized structure, containing a series of key/value pairs which can easily be parsed (extracted).
JSON is used for websites such as Twitter, Facebook and Flickr to update asynchonously (without page reloads), and is the core in developing full-stack JavaScript applications. A sample snippet of JSON from Facebook can be seen below:
{
   "data": [
      {
         "id": "X999_Y999",
         "from": {
            "name": "Tom Brady", "id": "X12"
         },
         "message": "Looking forward to 2010!",
         "actions": [
            {
               "name": "Comment",
               "link": "http://www.facebook.com/X999/posts/Y999"
            },
            {
               "name": "Like",
               "link": "http://www.facebook.com/X999/posts/Y999"
            }
         ],
         "type": "status",
         "created_time": "2010-08-02T21:27:44+0000",
         "updated_time": "2010-08-02T21:27:44+0000"
      },
      {
         "id": "X998_Y998",
         "from": {
            "name": "Peyton Manning", "id": "X18"
         },
         "message": "Where's my contract?",
         "actions": [
            {
               "name": "Comment",
               "link": "http://www.facebook.com/X998/posts/Y998"
            },
            {
               "name": "Like",
               "link": "http://www.facebook.com/X998/posts/Y998"
            }
         ],
         "type": "status",
         "created_time": "2010-08-02T21:27:44+0000",
         "updated_time": "2010-08-02T21:27:44+0000"
      }
   ]
}
Step 0: Installation
Before we can get started, we’ll need to get some dependencies out of the way. To begin, we’ll need to install the
Python Package Manager, pip. Mac, Linux and Windows users may refer here for instructions for installing pip.
Tip: I highly recommend creating a Virtual Environment. These environments allow you to effectively "sandbox" python packages, which is great for development.
With pip in tow, we’ll install the following dependencies:
- Django
- Requests
To do so, simple run the following commands in your terminal:
$ pip install django
$ pip install requests
With that all said and done, let’s get into the development of the application.
Step 1: Starting our project
To kick things off, let’s create our Django project. Within your terminal:
$ django-admin startproject demonstrationWhere demonstration is the name you choose for your own project.
Warning: Avoid using names such as django or test, these names will collide with built-in Python packages.
Let’s take a look at our brand new project:
demonstration/
├── demonstration
│   ├── __init__.py
│   ├── settings.py
│   ├── urls.py
│   └── wsgi.py
└── manage.py
Breaking down each of these files:
-
demonstration/manage.py: A command-line program allowing users to interact with their Django applications.
-
demonstration/demonstration/init.py: An empty file signifying that this directory is considered a Python package.
-
demonstration/demonstration/settings.py: A file consisting of key-value pairs for configuring your Django application. You can configure your databases, setup paths to static files, and much more.
-
demonstration/demonstration/urls.py: Allows us to map view functions to URLs, which is essentially a table of contents for our application. You can read much more about it here.
-
demonstration/demonstration/wsgi.py: Allows us to deploy WSGI-compatible web servers, which you can read about more here.
Running the server
Django comes pre-packaged with it’s own web server, which is pretty awesome. It allows us to run our application locally, and view any changes that we’ve made. To do so, let’s go ahead and run the following command:
$ python manage.py runserverTip: I recommend having multiple terminal sessions open, one for having the Django server running, one for opening up text editors and one for comitting to a repository if you are using version control while building this application.
When running this command, you’ll be greeted with the following error in your terminal:

Let’s go ahead and fix that. You can stop the server using Control + C (Command + C on a Mac). Go ahead and run the following command:
$ python manage.py migrate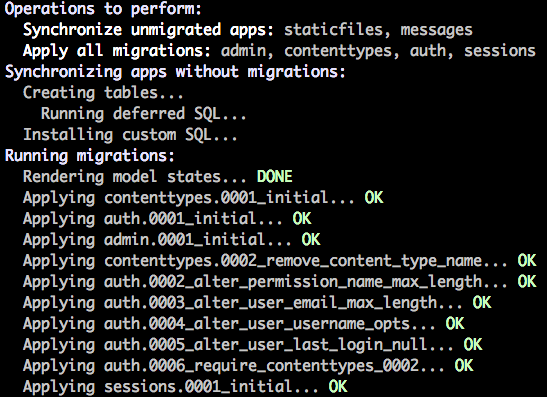
This command will build all of the default database tables that Django needs for built-in services such as user authentication. For now, this isn’t too relevant to us.
Note: This will generate a db.sqlite3 database file, which would generally contain information regarding our models. For this project, we won't be dealing with the database.
Once again, we’ll run the server:
$ python manage.py runserverNavigate to http://127.0.0.1:8000/ and you’ll be greeted with the nice shiny page:
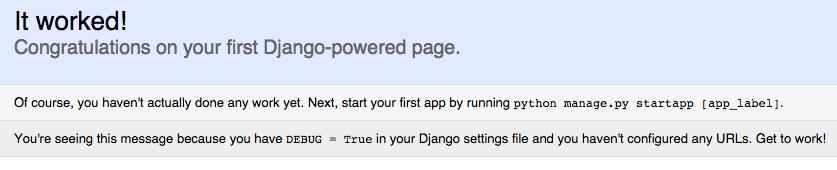
Great! You’ve run your first Django web application. However, as the message states, we haven’t configured any URLs yet. We’ll get to that shortly, but for now let’s actually create our application.
Step 2: Creating your application
You’re probably thinking, “Didn’t we already create our application?” Not quite, that was our project environment that we setup earlier. Within a Django Project, there can exist many “Applications”, one of which we’ll create right now:
$ python manage.py startapp appWhere app is the name you’ve chosen for this specific application. It is within this folder that we’ll be writing a bulk of our code in, with the exception of modifying the base urls.py and settings.py file.
app/
├── __init__.py
├── admin.py
├── migrations
│   └── __init__.py
├── models.py
├── tests.py
└── views.py
Breaking down these files:
-
app/admin.py: Allows us to register our models to view on the Django Admin Site.
-
app/migrations: Keeps track of our migrations which are essentially Django’s way of propagating changes that are made to our models.
-
app/models.py: Stores our representations of objects which will be stored in our database.
-
app/tests.py: Our unit tests will live here. Although Django calls these tests “unit tests”, they’re actually closer to integration tests.
-
app/views.py: All of our views will live here, which are mapped to URLs.
With that, we’ve successfully generated our project scaffold. Before moving on, we’ll configure our Settings.py while which will be important going forward.
Configuring Settings.py
Settings.py contains various configuration options available, such as changing your database and so much more. For this project, we’ll need to add the following lines anywhere in this file:
TEMPLATE_DIRS = [os.path.join(BASE_DIR, 'templates')]This will configure our paths for our Static files (CSS, JavaScript, images, etc) as well as the path to our template files.
Lastly, we’ll need to register your application (named app) under the Installed Apps section:
INSTALLED_APPS = (
    'django.contrib.admin',
    'django.contrib.auth',
    'django.contrib.contenttypes',
    'django.contrib.sessions',
    'django.contrib.messages',
    'django.contrib.staticfiles',
    'app',
)
We’ll now move onto configuring a basic URL which will print out “Hello World”.
Step 3: Your First View
As mentioned earlier, URLs map to functions in your views.py which in turn will pass data to a template. Within app/views.py:
# views.py

from django.shortcuts import render, HttpResponse

# Create your views here.

def index(request):
    return HttpResponse('Hello World!')
Tip: Python has a great style guide, which I highly recommend taking a look at. At the very least, learn to adopt not mixing tabs with spaces, which will make your code consistent and avoid errors when running your Python code.
In order to map urls to our view methods, we’ll need to configure them. Within our root URLs file within the demonstration folder, we’ll configure our urls to be proceeded by app/:
# demonstration/urls.py

from django.conf.urls import include, url
from django.contrib import admin

urlpatterns = [
  url(r'^app/', include('app.urls')),
  url(r'^admin/', include(admin.site.urls)),
]
Now, our URLs may be accessed as http://127.0.0.1:8000/app/<view url>. We’ll now create a new urls.py file within app/:
$ cd ..
$ cd app
$ vim urls.py
And we’ll add the following content:
# app/urls.py

from django.conf.urls import url

from app import views

urlpatterns = [
  url(r'^$', views.index, name='index'),
]
Tip: You can read more about URL configuration here.
After configuring your app/urls.py as shown, you should be prompted with the following response when you navigate to http://127.0.0.1:8000/app/:
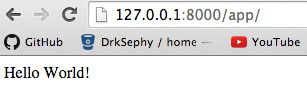
We’ve successfully mapped the /app/ url to the index function within app/views.py. Pretty simple, right? At this point,
can you see the application flow that we described earlier? To further emphasize this, try and see if you can create a new url, map it to your view, and display the string My second view! on your own. We’ll include the code to do so below:
# app/urls.py

from django.conf.urls import url

from app import views

urlpatterns = [
  url(r'^$', views.index, name='index'),
  url(r'^test/$', views.test, name='test'),
]
# views.py
from django.shortcuts import render, HttpResponse
import requests
# Create your views here.
def index(request):
return HttpResponse('Hello World!')
def test(request):
return HttpResponse('My second view!')If we navigate to http://127.0.0.1:8000/app/test/, you should be greeted with the text “My second view!”.
Alright, you should be getting the hang of it now. We’ve been making some toy views, but how about we move onto displaying some meaningful data to the user? In particular, we’ll display the Github profile information for a given user.
Step 4: Integrating the Github API
The Github API contains a collection of URLs which a developer can query using HTTP methods to retrieve data, in the form of JSON. In order to leverage this API, we’ll use the Python Requests library which will make this process simple. From the API for users, we can get profile information by using the following URL:
https://api.github.com/users/:userWhere :user is the name of the Github user you’d like to query profile information about. Before we display this data in Django, I highly encourage you to open up a terminal shell and try the following:
$ python
>>> import requests
>>> req = requests.get('https://api.github.com/users/DrkSephy')
>>> print req.content
You should be presented with the following data:
{
    "login": "DrkSephy",
    "id": 1226900,
    "avatar_url": "https://avatars.githubusercontent.com/u/1226900?v=3",
    "gravatar_id": "",
    "url": "https://api.github.com/users/DrkSephy",
    "html_url": "https://github.com/DrkSephy",
    "followers_url": "https://api.github.com/users/DrkSephy/followers",
    "following_url": "https://api.github.com/users/DrkSephy/following{/other_user}",
    "gists_url": "https://api.github.com/users/DrkSephy/gists{/gist_id}",
    "starred_url": "https://api.github.com/users/DrkSephy/starred{/owner}{/repo}",
    "subscriptions_url": "https://api.github.com/users/DrkSephy/subscriptions",
    "organizations_url": "https://api.github.com/users/DrkSephy/orgs",
    "repos_url": "https://api.github.com/users/DrkSephy/repos",
    "events_url": "https://api.github.com/users/DrkSephy/events{/privacy}",
    "received_events_url": "https://api.github.com/users/DrkSephy/received_events",
    "type": "User",
    "site_admin": false,
    "name": "David Leonard",
    "company": "Yahoo!",
    "blog": "https://drksephy.github.io",
    "location": "Sunnyvale, California",
    "email": "DrkSephy1025@gmail.com",
    "hireable": false,
    "bio": null,
    "public_repos": 68,
    "public_gists": 5,
    "followers": 127,
    "following": 6,
    "created_at": "2011-11-29T01:15:27Z",
    "updated_at": "2015-07-17T13:17:54Z"
}
As easy as that, we performed an HTTP GET request to the API endpoint and received JSON back. Let’s go ahead and wire this up in Django. As an exercise, try to create the urls and view method yourself before moving forward.
# app/urls.py

from django.conf.urls import url

from app import views

urlpatterns = [
  url(r'^$', views.index, name='index'),
  url(r'^test/$', views.test, name='test'),
  url(r'^profile/$', views.profile, name='profile'),
]
Going forward, we’ll need a method to load json strings easily. Be sure to import json as shown in the code snippet below:
# views.py

from django.shortcuts import render, HttpResponse
import requests
import json

# Create your views here.

def index(request):
    return HttpResponse('Hello World!')

def test(request):
    return HttpResponse('My second view!')

def profile(request):
    req = requests.get('https://api.github.com/users/DrkSephy')
    content = req.text
    return HttpResponse(content)
Navigate to http://127.0.0.1:8000/app/profile and you’ll be greeted with the following response:

At the moment, the output is kind of messy. Let’s update our view profile view to bundle up the values in the JSON that we are interested in displaying to the user:
def profile(request):
    jsonList = []
    req = requests.get('https://api.github.com/users/DrkSephy')
    jsonList.append(json.loads(req.content))
    parsedData = []
    userData = {}
    for data in jsonList:
    userData['name'] = data['name']
        userData['blog'] = data['blog']
        userData['email'] = data['email']
        userData['public_gists'] = data['public_gists']
        userData['public_repos'] = data['public_repos']
        userData['avatar_url'] = data['avatar_url']
        userData['followers'] = data['followers']
        userData['following'] = data['following']
    parsedData.append(userData)
    return HttpResponse(parsedData)
Which will return the new response:

As of now, we’ve covered a bunch of topics in only < 30 lines of Python. Let’s take a moment to recap what we’ve learned:
- Creating our project structure
- Learned the basics of MVC
- Mapping our URLs
- Writing several view methods
- APIs, and how to query data using Requests
- Displaying data to the user
You might be thinking that our design leaves plenty to be desired. If so, you’re right. We’ll use the Twitter Bootstrap library to spruce things up within a template, but before that we’ll install Bower to grab our front-end dependencies.
Bower
Bower is a front-end dependency manager for your project. In laymans terms, it is a command-line program which you can utilize to download libraries such as Twitter Bootstrap. The beauty of this approach is that we can generate a bower.json file, which any user can copy and use to download a bunch of packages easily - as opposed to going to each site, and manually copy/pasting/saving out files.
In this step, I’ll walk you through downloading Twitter bootstrap as well as generating your own bower.json. Before we do this, we’ll create a .bowerrc file.
In the same directory as manage.py, create a .bowerrc file with the following content:
{
    "directory": "app/static/"
}
Anytime we run bower, it will output the downloaded files within the directory listed here.
Tip: There is a huge array of configuration options which can be used, for those curious.
And now in our command line, we can simply run:
$ bower install bootstrapThis will download Twitter Bootstrap into our project directory, as specified within our .bowerrc file.
Step 5: Templating
Templates in Django are essentially HTML files which we pass in a context which then renders our data to the user. Before we can create our first template, we’ll need to create some folders. In the same directory as your app/views.py:
$ mkdir templates
$ mkdir templates/app
$ cd templates/app
Within our templates/app folder, we’ll create our profile.html:
<!DOCTYPE html>
<html>
<head>
    <script src="/static/jquery/dist/jquery.js"></script>
    <script type="text/javascript" src="/static/bootstrap/dist/js/bootstrap.min.js"></script>
    <link rel="stylesheet" href="/static/bootstrap/dist/css/bootstrap.min.css">
    <link rel="stylesheet" href="/static/bootstrap/dist/css/bootstrap-theme.min.css">
</head>
<body>
<h1 class="text-center"> Github User Data </h1>
	<div class="col-lg-12">
        <div class="table-responsive">
            <table class="table table-bordered table-hover table-striped tablesorter">
                <thead>
                <tr>
                  <th class="header"> Username <i class="icon-sort"></i></th>
                  <th class="header"> Blog <i class="icon-sort"></i></th>
                  <th class="header"> Public Repos <i class="icon-sort"></i></th>
                  <th class="header"> Public Gists <i class="icon-sort"></i></th>
                  <th class="header"> Email <i class="icon-sort"></i></th>
                  <th class="header"> Followers <i class="icon-sort"></i></th>
                  <th class="header"> Following <i class="icon-sort"></i></th>
                </tr>
            </thead>
            <tbody>

            {% for key in data %}
                <tr>
                    <td>{{ key.name }}</td>
                    <td>{{ key.blog }}</td>
                    <td>{{ key.public_repos }}</td>
                    <td>{{ key.public_gists }}</td>
                    <td>{{ key.email }}</td>
                    <td>{{ key.followers }}</td>
                    <td>{{ key.following }}</td>
                </tr>
            {% endfor %}

            </tbody>
            </table>
        </div>
    </div>
</body>
</html>
Most of this is just Bootstrap classes for styling, but there is one important syntax to observe here:
    {% for key in data %}
{% endfor %}
This syntax allows us to iterate over a data structure using a for loop, which should look familiar. Within this for loop, we do the following:
    {{ key.name }}
{{ key.blog }}
{{ key.public_repos }}
    ...
In this case, data is an array of dictionaries, in which each dictionary has the name, blog, and public_repos keys (and a few others, listed in the above snippet for brevity). Here we access these properties and display them using the double curly braces syntax, which are template varaible placeholders which will take on the value of the expression within.
Tip: For deeper insight to templating and variables, check out the documentation here.
With this new template in hand, let’s reload our profile page:

Awesome, we’ve got a nice layout. As of now, our view method is essentially hardcoded - we can’t query any particular user’s Github information. We’ll need to come up with a way to ask the user for an input, and to do this we’ll move onto forms.
Step 6: Forms
Forms are the bread and butter of web applications - every web programmer will come across them at one point or another. Forms essentially allow users to interact with your web application through various fields for input, usually for registration pages or in our case, performing a query.
To begin, we’ll go ahead and build our form within our profile.html:
<style>
  .form-signin {
    max-width: 550px;
    padding: 15px;
    margin: 0 auto;
  }
</style>


<div class="container text-center">
    <form class="form-signin" id="login_form" method="post" action="/app/profile/">
      {% csrf_token %}

      <br>
      <input type="text" name="user" class="form-control" placeholder="Github User Name, e.g: DrkSephy" value="" required autofocus>
      <br>
      <button class="btn btn-lg btn-primary btn-block" type="submit">Get Data</button>
    </form>
</div>
Let’s break this down in pieces:
<style>
  .form-signin {
    max-width: 550px;
    padding: 15px;
    margin: 0 auto;
  }
</style>
This is simply a CSS class which we’ll use to style our form with.
<div class="container text-center">
    <form class="form-signin" method="post" action="/app/profile/">
        ...
    </form>
</div>
Here we are creating our form element which is styled by our CSS class using:
<form class="form-signin" ... >We’re also specifying the type of HTTP method this form will perform after submission:
<form ... method="post" ... >Once we submit our form, it will perform an HTTP post request which will send the input that the user inputs as parameters to the following url:
<form ... ... action="/app/profile/">Where /app/profile/ is our view function which will handle the POST request.
{% csrf_token %}The csrf_token will protect against any cross site forgery attacks.
Next, we look at our input field:
<input type="text" name="user" class="form-control" placeholder="Github User Name, e.g: DrkSephy" required autofocus>Which has the following attributes:
<!-- The type of input the field is expecting -->
<input type="text" ... >
<!-- This key/value pair will be sent as a POST parameter upon submission -->
<input ... name="user" ... ><!-- placeholder text for the form field -->
<input ... placeholder="Github User Name, e.g: DrkSephy" ... ><!-- make a blue border around the form field when user has clicked to type -->
<input ... required autofocus>The most important attribute to pay attention to is name=user. This name parameter will have it’s value user sent as a POST parameter once the user submits the form, which we’ll get into shortly. The last bit for our form is the actual submission, which will be a button:
<button class="btn btn-lg btn-primary btn-block" type="submit">Get Data</button>Where we provide attributes specifying the bootstrap styling class btn btn-lg btn-primary btn-block, as well as the type of action to perform when this button is clicked (in this case, a submit action.) Once this button is clicked, the form will be submitted and the values from it’s form fields (here we only have one form field) will be sent as a POST request to the corresponding URL set earlier.
Putting it all together:
<!DOCTYPE html>
<html>
<head>
    <script src="/static/jquery/dist/jquery.js"></script>
    <script type="text/javascript" src="/static/bootstrap/dist/js/bootstrap.min.js"></script>
    <link rel="stylesheet" href="/static/bootstrap/dist/css/bootstrap.min.css">
    <link rel="stylesheet" href="/static/bootstrap/dist/css/bootstrap-theme.min.css">
</head>
<body>
<h1 class="text-center"> Github User Data </h1>
  <div class="col-lg-12">
      <style>
        .form-signin {
          max-width: 550px;
          padding: 15px;
          margin: 0 auto;
        }
      </style>


      <div class="container text-center">
          <form class="form-signin" id="login_form" method="post" action="/app/profile/">

            {% csrf_token %}


            <br>
            <input type="text" name="user" class="form-control" placeholder="Github User Name, e.g: DrkSephy" value="" required autofocus>
            <br>
            <button class="btn btn-lg btn-primary btn-block" type="submit">Get Data</button>
          </form>
      </div>
      <div class="table-responsive">
          <table class="table table-bordered table-hover table-striped tablesorter">
              <thead>
              <tr>
                <th class="header"> Username <i class="icon-sort"></i></th>
                <th class="header"> Blog <i class="icon-sort"></i></th>
                <th class="header"> Public Repos <i class="icon-sort"></i></th>
                <th class="header"> Public Gists <i class="icon-sort"></i></th>
                <th class="header"> Email <i class="icon-sort"></i></th>
                <th class="header"> Followers <i class="icon-sort"></i></th>
                <th class="header"> Following <i class="icon-sort"></i></th>
              </tr>
          </thead>
          <tbody>


          {% for key in data %}
              <tr>
                  <td>{{ key.name }}</td>
                  <td>{{ key.blog }}</td>
                  <td>{{ key.public_repos }}</td>
                  <td>{{ key.public_gists }}</td>
                  <td>{{ key.email }}</td>
                  <td>{{ key.followers }}</td>
                  <td>{{ key.following }}</td>
              </tr>
          {% endfor %}


          </tbody>
          </table>
      </div>
    </div>
</body>
</html>
Next, we’ll learn how to capture these POST parameters in our views and use them.
Step 7: Capturing POST parameters
As mentioned, performing a POST request will send parameters that can be accessed programmatically. Let’s modify our profilemethod within app/views.py to access the user value that was passed through our form submission:
def profile(request):
    parsedData = []
    if request.method == 'POST':
        username = request.POST.get('user')
        req = requests.get('https://api.github.com/users/' + username)
        jsonList = []
        jsonList.append(json.loads(req.content))
        userData = {}
        for data in jsonList:
            userData['name'] = data['name']
            userData['blog'] = data['blog']
            userData['email'] = data['email']
            userData['public_gists'] = data['public_gists']
            userData['public_repos'] = data['public_repos']
            userData['avatar_url'] = data['avatar_url']
            userData['followers'] = data['followers']
            userData['following'] = data['following']
        parsedData.append(userData)
    return render(request, 'app/profile.html', {'data': parsedData})
Most of the code is exactly the same, but we’ll break down the new additions in pieces:
if request.method == 'POST':If our profile method was accessed through a POST request, this condition will be true. Likewise, we could write additional logic to handle cases for GET, UPDATE, and DELETE requests here based on the type of request we specified in our form.
username = request.POST.get('user')Here we actually access our POST parameters. From our form, we know that our single field had an attribute of name with a corresponding value user, which was passed upon form submission. We’ll use this value to build a request url:
req = requests.get('https://api.github.com/users/' + username)And the rest is the same as before. Using the new parameterized url, it will grab the Github profile information for a given username as passed through our form. Go ahead and try putting in various usernames of your friends on Github!
I hope this guide has been helpful for beginners (and possibly non-beginners). I’ll be exploring more complicated tech stacks using Django + ReactJS in the near future, so stay tuned for more tutorials.
Thanks for reading.