With ReactJS becoming one of the hottest JavaScript libraries in late 2014, I decided to investigate the hype. What better way to do so then by building an actual application using ReactJS and the Flux architecture, while documenting my process for others to learn?
Project Directory
To demonstrate and explore ReactJS + Flux, we will build a simple shopping cart application. Below is an overview of what our project structure will look like:
flux
├── dist
│   ├── index.html
│   └── js
│       └── main.js
├── gulpfile.js
├── package.json
└── src
    ├── index.html
    └── js
        ├── actions
        │   └── app-actions.js
        ├── components
        │   ├── app-addtocart.js
        │   ├── app-cart.js
        │   ├── app-catalog.js
        │   ├── app-decrease.js
        │   ├── app-increase.js
        │   ├── app-removefromcart.js
        │   └── app.js
        ├── constants
        │   └── app-constants.js
        ├── dispatchers
        │   ├── app-dispatcher.js
        │   └── dispatcher.js
        ├── main.js
        └── stores
            └── app-store.js
For those interested in simply viewing the finalized project, you may find the source code here.
Environment setup
For this project, we will be using npm to install various packages, as well as gulp for
task automation. Below is the package.json file that contains all dependencies needed for
this project:
{
  "name": "flux",
  "version": "0.0.0",
  "description": "",
  "main": "index.js",
  "dependencies": {
    "gulp": "^3.8.11",
    "gulp-browserify": "^0.5.1",
    "gulp-concat": "^2.4.3",
    "react": "^0.12.2",
    "reactify": "^1.0.0"
  },
  "devDependencies": {},
  "scripts": {
    "test": "echo \"Error: no test specified\" && exit 1"
  },
  "author": "",
  "license": "ISC"
}
Once you have package.json in your root directory, simply run:
~/flux λ npm installTip: For OS X users, you will have to run sudo npm install.
If you haven’t had exposure to using gulp, use this as your first starting point.
/************************
*------gulpfile.js------*
************************/

var gulp = require('gulp');
var browserify = require('gulp-browserify');
var concat = require('gulp-concat');
Here, we require the modules we will need within our gulpfile.js. ReactJS supports what is known as JSX, which is a JavaScript-HTML hybrid syntax. We create a gulp task to transform this using reactify for all of our JavaScript files, which will be concatanted into a single file: main.js within the dist folder.
gulp.task('browserify', function(){
	gulp.src('src/js/main.js')
		.pipe(browserify({transform: 'reactify'}))
		.pipe(concat('main.js'))
		.pipe(gulp.dest('dist/js'));
});
Next up, we also copy our index.html into the dist folder:
gulp.task('copy', function(){
	gulp.src('src/index.html')
		.pipe(gulp.dest('dist'));
});
We now tell grunt which tasks to load:
gulp.task('default', ['browserify', 'copy']);When running gulp in our terminal, the above tasks will be executed - our dist folder will
contain our production files which have been converted using reactify.
Lastly, let us configure a watch task which will check for changes in our project files and update the page accordingly:
gulp.task('watch', function(){
	gulp.watch('src/**/*.*', ['default']);
});
Running gulp watch will continually check for changes to your project files.
Putting it all together, this is what our gulpfile.js is looking like:
/************************
*------gulpfile.js------*
************************/

var gulp = require('gulp');
var browserify = require('gulp-browserify');
var concat = require('gulp-concat');

gulp.task('browserify', function(){
	gulp.src('src/js/main.js')
		.pipe(browserify({transform: 'reactify'}))
		.pipe(concat('main.js'))
		.pipe(gulp.dest('dist/js'));
});

gulp.task('copy', function(){
	gulp.src('src/index.html')
		.pipe(gulp.dest('dist'));
});

gulp.task('default', ['browserify', 'copy']);

gulp.task('watch', function(){
	gulp.watch('src/**/*.*', ['default']);
});
Great! Now we have our environment completely set up. Let’s jump into the application.
Lastly, we create the directories needed within our project.
~/flux λ mkdir src
~/flux λ cd src
~/flux/src λ mkdir js
~/flux/src/js λ mkdir actions components constants dispatchers stores
Index.html
Our first step in building our application will be building our index.html file, which will be
our application entry point.
~/flux/src λ vim index.html<!DOCTYPE html>
<html lang="en">
<head>
<meta charset="UTF-8">
<title>Document</title>
<link rel="stylesheet" media="screen" href="http://netdna.bootstrapcdn.com/bootstrap/3.1.0/css/bootstrap.min.css">
</head>
<body>
<div id="main" class="containter"></div>
<script src="js/main.js"></script>
</body>
</html>Here we have included Bootstrap for tables, a div with id=main, which will be where we mount our React components to from main.js. Now that this part is finished, we move onto building our central app.js file.
Main.js and App.js
The purpose of these files is to tie in all of our components that will be needed. For our shopping cart application we will be building two major components: an item catalog as well as an item cart, which will both be defined towards the end of our application.
~/flux/src/js λ vim main.js/************************
*--------main.js--------*
************************/
/** @jsx React.DOM */
var APP = require('./components/app');
var React = require('react');
React.renderComponent(
<APP />,
document.getElementById('main'));~/flux/src/js/components λ vim app.js/************************
*--------app.js---------*
************************/
/** @jsx React.DOM */
var React = require('react
');
var Catalog = require('../components/app-catalog.js');
var Cart = require('../components/app-cart.js');
var APP =
React.createClass({
render: function(){
return (
<div>
<h1> Lets Shop </h1>
<Catalog />
<h1>Cart</h1>
<Cart />
</div>
)
}
});
module.exports = APP;Introducing Flux
Flux is not to be confused with a framework, it is closer to a design pattern in which we have a unidirectional data flow throughout our application. This simplifies our logic and allows us to build web applications which will scale over time no matter how complicated and numerous our views and models (from MVC standpoints) may grow.
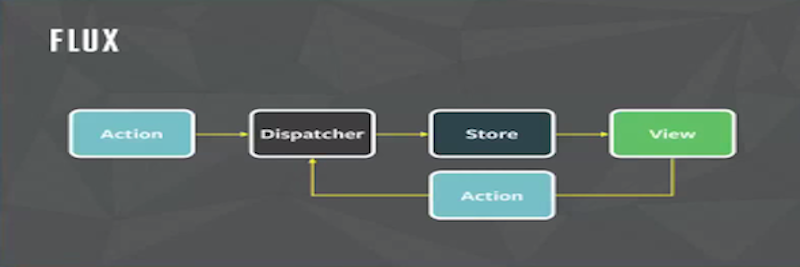
Over the course of this tutorial, we will cover each of the key components that make up Flux as we develop our application.
Dispatchers
The role of the dispatcher within the Flux model is to prevent race conditions, which it does
by queueing up all events in our application as promises, and will execute them in the order
in which they are received. The first piece of code is actually the boilerplate dispatcher.js
file provided by the Facebook team:
~/flux/src/js/dispatchers λ vim dispatcher.js/************************
*-----dispatcher.js-----*
************************/
var Promise = require('es6-promise').Promise;
var merge = require('react/lib/merge');
var _callbacks = [];
var _promises = [];
/**
* Add a promise to the queue of callback invocation promises.
* @param {function} callback The Store's registered callback.
* @param {object} payload The data from the Action.
*/
var _addPromise = function(callback, payload) {
_promises.push(new Promise(function(resolve, reject) {
if (callback(payload)) {
resolve(payload);
} else {
reject(new Error('Dispatcher callback unsuccessful'));
}
}));
};
/**
* Empty the queue of callback invocation promises.
*/
var _clearPromises = function() {
_promises = [];
};
var Dispatcher = function() {};
Dispatcher.prototype = merge(Dispatcher.prototype, {
/**
* Register a Store's callback so that it may be invoked by an action.
* @param {function} callback The callback to be registered.
* @return {number} The index of the callback within the _callbacks array.
*/
register: function(callback) {
_callbacks.push(callback);
return _callbacks.length - 1; // index
},
/**
* dispatch
* @param {object} payload The data from the action.
*/
dispatch: function(payload) {
_callbacks.forEach(function(callback) {
_addPromise(callback, payload);
});
Promise.all(_promises).then(_clearPromises);
}
});
module.exports = Dispatcher;We will need to install es6-promises to use within dispatcher.js. Let’s go ahead and do that:
npm install es6-promisesNote: For OS X users, you will have to run sudo npm install es6-promises.
Note: Keep track of the merge library, which we will use to extend the method Dispatcher.prototype with additional functionality throughout this project.
With this boilerplate out of the way, we build our own app-dispatcher, which will be responsible for queueing up the incoming actions that our application can take.
~/flux/src/js/dispatchers λ vim app-dispatcher.js/************************
*---app-dispatcher.js---*
************************/
var Dispatcher = require('./dispatcher.js');
var merge = require('react/lib/merge');
var AppDispatcher = merge(Dispatcher.prototype, {
handleViewAction: function(action){
console.log('action', action);
this.dispatch({
source: 'VIEW_ACTION',
action: action
})
}
})
module.exports = AppDispatcher;Within handleViewAction, we build an object containing the action to take through action: action. Also notice how we used merge to extend the Dispatcher.prototype method from dispatcher.js with this new method.
With our dispatchers now out of the way, we move onto defining these actions which can occur in our application. Before we can do so, let us define some action constants within constants/app-constants.js:
~/flux/src/js/constants λ vim app-constants.js/************************
*----app-constants.js---*
************************/
module.exports = {
ADD_ITEM: 'ADD_ITEM',
REMOVE_ITEM: 'REMOVE_ITEM',
INCREASE_ITEM: 'INCREASE_ITEM',
DECREASE_ITEM: 'DECREASE_ITEM',
};Actions
An Action within the Flux architecture is nothing more than an event which will get propogated through the Dispatcher, which will tell the Store how to react. We will define what a Store
is a little later, but for now let us define all possible actions that can occur in a shopping application:
~/flux/src/js/actions λ vim app-actions.js/************************
*----app-actions.js-----*
************************/
var AppConstants = require('../constants/app-constants.js');
var AppDispatcher = require('../dispatchers/app-dispatcher.js');
var AppActions = {
}
module.exports = AppActions;Here we require the modules we need to define our actions with, and we declare an object AppActions which will contain all our methods that will be executed based on the action.
var AppActions = {
	addItem:function(item){
		AppDispatcher.handleViewAction({
		  actionType: AppConstants.ADD_ITEM,
		  item: item
		})
	},
}
We first define our addItem method, which takes an item as a parameter. We then call our AppDispatcher.handleViewAction and pass in an object containing the type of action that the Store will need to take, as well as the corresponding item which will be added.
var AppActions = {
  removeItem:function(index){
    AppDispatcher.handleViewAction({
      actionType: AppConstants.REMOVE_ITEM,
      index: index
    })
  },
}
Here we define a similar action to addItem, removeItem which takes an index of the item which we will remove from our Cart which we will define later. Next we define two similar
methods, decreaseItem and increaseItem, which both take an index as the parameter.
  decreaseItem:function(index){
    AppDispatcher.handleViewAction({
      actionType: AppConstants.DECREASE_ITEM,
      index: index
    })
}, increaseItem:function(index){
AppDispatcher.handleViewAction({
actionType: AppConstants.INCREASE_ITEM,
index: index
})
}Great! We have now defined all the actions that can occur in our shopping application. Let’s check out what our app-actions.js is looking like now:
/************************
*----app-actions.js-----*
************************/
var AppConstants = require('../constants/app-constants.js');
var AppDispatcher = require('../dispatchers/app-dispatcher.js');
var AppActions = {
addItem:function(item){
AppDispatcher.handleViewAction({
actionType: AppConstants.ADD_ITEM,
item: item
})
},
removeItem:function(index){
AppDispatcher.handleViewAction({
actionType: AppConstants.REMOVE_ITEM,
index: index
})
},
decreaseItem:function(index){
AppDispatcher.handleViewAction({
actionType: AppConstants.DECREASE_ITEM,
index: index
})
},
  increaseItem:function(index){
    AppDispatcher.handleViewAction({
      actionType: AppConstants.INCREASE_ITEM,
      index: index
    })
  }
}
module.exports = AppActions;With our actions defined, we move onto the next main component of our application: the Store.
Stores
Stores in Flux react to events (actions). The Store registers what events it is listening for with the Dispatcher.
Note: Stores look like a controller, but are actually closer to a service in AngularJS.
We begin with our app-store.js:
~/flux/src/js/stores λ vim app-store.js/************************
*-----app-store.js------*
************************/
var AppDispatcher = require('../dispatchers/app-dispatcher');
var AppConstants = require('../constants/app-constants');
var merge = require('react/lib/merge');
var EventEmitter = require('events').EventEmitter;Note: We are using the EventEmitter method from NodeJS, which will come in handy when broadcasting that an action has occured to the Store and to the subsequent Components, which we will implement shortly.
var CHANGE_EVENT = "change";Here we define a CHANGE_EVENT variable, which will simply save us some writing in the future. We will use this to signal when an action has taken place and that the Store needs to act accordingly.
Next we will define some dummy items for our actual store (not to be confused with the Store) in the Flux architecture. Since we are not using any sort of external database or API, we will put these items here.
var _catalog = [];
for(var i=1; i<9; i++){
_catalog.push({
'id': 'Widget' +i,
'title':'Widget #' + i,
'summary': 'This is an awesome widget!',
'description': 'Lorem ipsum dolor sit amet consectetur adipisicing elit. Ducimus, commodi.',
'img': '/assets/product.png',
'cost': i
});
}Next up we define the actual methods which handle the data within our cart, which stores the items we have chosen to purchase.
var _cartItems = [];
function _removeItem(index){
_cartItems[index].inCart = false;
_cartItems.splice(index, 1);
}
function _increaseItem(index){
_cartItems[index].qty++;
}
function _decreaseItem(index){
if(_cartItems[index].qty>1){
_cartItems[index].qty--;
}
else {
_removeItem(index);
}
}
function _addItem(item){
if(!item.inCart){
item['qty'] = 1;
item['inCart'] = true;
_cartItems.push(item);
}
else {
_cartItems.forEach(function(cartItem, i){
if(cartItem.id === item.id){
_increaseItem(i);
}
});
}
}
function _cartTotals(){
var qty =0, total = 0;
_cartItems.forEach(function(cartItem){
qty += cartItem.qty;
total += cartItem.qty*cartItem.cost;
});
return {'qty': qty, 'total': total};
}For the most part, these mthods should be self-explanatory. We now implement our actual AppStore, which will merge more functionality into dispatcher.js by extending the NodeJS eventEmitter method.
var AppStore = merge(EventEmitter.prototype, {
emitChange: function(){
this.emit(CHANGE_EVENT)
},
addChangeListener: function(callback){
this.on(CHANGE_EVENT, callback)
},
removeChangeListener: function(callback){
this.removeListener(CHANGE_EVENT, callback)
},
})
module.exports = AppStore;addChangeListener: This allows the Components to register with the Store, and the Store will listen for changes and will signal the appropriate callback method based on the action that has taken place.
The three methods above are important for registering when an event has been triggered, and we use callback methods in response to these events. Before we do the actual registration with the dispatcher, we will define some methods for getting data from our cart, catalog, and our item totals:
getCart: function(){
return _cartItems
},
getCatalog: function(){
return _catalog
},
getCartTotals: function(){
return _cartTotals();
},Lastly, we will register events that our Store will listen to with the Dispatcher. To do so, we will perform a switch case based on the action that has been received.
dispatcherIndex: AppDispatcher.register(function(payload){
var action = payload.action; // this is our action from handleViewAction
switch(action.actionType){
case AppConstants.ADD_ITEM:
_addItem(payload.action.item);
break;
case AppConstants.REMOVE_ITEM:
_removeItem(payload.action.index);
break;
case AppConstants.INCREASE_ITEM:
_increaseItem(payload.action.index);
break;
case AppConstants.DECREASE_ITEM:
_decreaseItem(payload.action.index);
break;
}
AppStore.emitChange();
return true;
})Note: It is important to notice that we return true at the end of our code. Keep in mind that the Dispatcher queues up a chain of promises, and we need to return true in order for these promises to be resolved.
Pro-tip: We provide the Dispatcher with an index in the event that we have multiple stores, we would like to keep track of which Store is trying to register an action with the Dispatcher.
Putting it all together, our app-store.js is looking like this:
/************************
*-----app-store.js------*
************************/

var AppDispatcher = require('../dispatchers/app-dispatcher');
var AppConstants = require('../constants/app-constants');
var merge = require('react/lib/merge');
var EventEmitter = require('events').EventEmitter;
var CHANGE_EVENT = "change";
var _catalog = [];

for(var i=1; i<9; i++){
  _catalog.push({
    'id': 'Widget' +i,
    'title':'Widget #' + i,
    'summary': 'This is an awesome widget!',
    'description': 'Lorem ipsum dolor sit amet consectetur adipisicing elit. Ducimus, commodi.',
    'img': '/assets/product.png',
    'cost': i
  });
}
var _cartItems = [];


function _removeItem(index){
  _cartItems[index].inCart = false;
  _cartItems.splice(index, 1);
}

function _increaseItem(index){
  _cartItems[index].qty++;
}

function _decreaseItem(index){
  if(_cartItems[index].qty>1){
    _cartItems[index].qty--;
  }
  else {
    _removeItem(index);
  }
}

function _addItem(item){
  if(!item.inCart){
    item['qty'] = 1;
    item['inCart'] = true;
    _cartItems.push(item);
  }
  else {
    _cartItems.forEach(function(cartItem, i){
      if(cartItem.id === item.id){
        _increaseItem(i);
      }
    });
  }
}

function _cartTotals(){
  var qty =0, total = 0;
  _cartItems.forEach(function(cartItem){
    qty += cartItem.qty;
    total += cartItem.qty*cartItem.cost;
  });
  return {'qty': qty, 'total': total};
}
var AppStore = merge(EventEmitter.prototype, {
emitChange: function(){
this.emit(CHANGE_EVENT)
},
addChangeListener: function(callback){
this.on(CHANGE_EVENT, callback)
},
removeChangeListener: function(callback){
this.removeListener(CHANGE_EVENT, callback)
},
getCart: function(){
	return _cartItems
},

getCatalog: function(){
	return _catalog
},

getCartTotals: function(){
	return _cartTotals();
},
dispatcherIndex: AppDispatcher.register(function(payload){
var action = payload.action; // this is our action from handleViewAction
switch(action.actionType){
case AppConstants.ADD_ITEM:
_addItem(payload.action.item);
break;
case AppConstants.REMOVE_ITEM:
_removeItem(payload.action.index);
break;
case AppConstants.INCREASE_ITEM:
_increaseItem(payload.action.index);
break;
case AppConstants.DECREASE_ITEM:
_decreaseItem(payload.action.index);
break;
}
AppStore.emitChange();
// Return true, this is a chain of promises that we need to resolve
return true;
})
})
module.exports = AppStore;Phew. That wraps up the implementation of the Store. Lastly, we move to our Components, which we have alluded to previously.
Components
React Components are essentially our views which grab state from the Store and pass it down through props to the child components. Components update whenever the events occur in our system through the Store via the Dispatcher. Since our view listens to the Store, it knows when the application state has changed and will update accordingly.
With that said, let us build our first React Component: app-addtocart.js:
~/flux/src/js/components λ vim app-addtocart.js/************************
*----app-addtocart.js---*
************************/
/** @jsx React.DOM */
var React = require('react');
var AppActions = require('../actions/app-actions.js');
var AddToCart =
React.createClass({
handleClick: function(){
AppActions.addItem(this.props.item);
},
render: function(){
return <button onClick={this.handleClick}> Add to cart </button>
}
});
module.exports = AddToCart;Here we use React.createClass to create a new Component with two methods: handleClick which will call the addItem action via AppActions and pass the item in to be added to our cart using this.props.item. We also define a render method which will render a button to add a selected item into our cart. Similarly, we define app-removefromcart.js, app-increase.js and app-decrease.js:
~/flux/src/js/components λ vim app-removefromcart.js/************************
*-app-removefromcart.js-*
************************/
/** @jsx React.DOM */
var React = require('react');
var AppActions = require('../actions/app-actions.js');
var RemoveFromCart =
React.createClass({
handleClick: function(){
AppActions.removeItem(this.props.index);
},
render: function(){
return <button onClick={this.handleClick}> x </button>
}
});
module.exports = RemoveFromCart;~/flux/src/js/components λ vim app-increase.js/************************
*----app-increase.js----*
************************/
/** @jsx React.DOM */
var React = require('react');
var AppActions = require('../actions/app-actions.js');
var Increase =
React.createClass({
handleClick: function(){
AppActions.increaseItem(this.props.index);
},
render: function(){
return <button onClick={this.handleClick}> + </button>
}
});
module.exports = Increase;~/flux/src/js/components λ vim app-decrease.js/************************
*----app-decrease.js----*
************************/
/** @jsx React.DOM */
var React = require('react');
var AppActions = require('../actions/app-actions.js');
var Decrease =
React.createClass({
handleClick: function(){
AppActions.decreaseItem(this.props.index);
},
render: function(){
return <button onClick={this.handleClick}> - </button>
}
});
module.exports = Decrease;Note: It is important to notice that these components do not inherit from a parent, they simply inherit from appActions. This is due to how data flows through the Flux architecture.
With these Components implemented, we now move onto the two big Components: app-catalog.js and app-cart.js, which control and display the items we can purchase and the items we currently want to buy, respectively. We start with app-catalog.js:
~/flux/src/js/components λ vim app-catalog.js/************************
*-----app-catalog.js----*
************************/
/** @jsx React.DOM */
var React = require('react');
var AppStore = require('../stores/app-store.js');
var AddToCart = require('../components/app-addtocart.js');
function getCatalog(){
return {items: AppStore.getCatalog()}
}We have defined a single method so far: getCatalog which returns a new object containing the set of items within the item catalog.
Next, we define our actual Catalog, which will contain two methods: getInitialState for getting the items within our item catalog, and a render method for displaying these items.
var Catalog =
React.createClass({
getInitialState: function(){
return getCatalog();
},
render: function(){
var items = this.state.items.map(function(item){
return <tr><td>{item.title}</td>
<td>${item.cost}</td>
<td><AddToCart item={item} /></td>
</tr>
})
return (
<table className="table table-hover">
{items}
</table>
)
}
});
module.exports = Catalog;Putting it together, app-catalog.js is shown below:
/************************
*-----app-catalog.js----*
************************/

/** @jsx React.DOM */
var React = require('react');
var AppStore = require('../stores/app-store.js');
var AddToCart = require('../components/app-addtocart.js');

function getCatalog(){
	return {items: AppStore.getCatalog()}
}
var Catalog =
	React.createClass({
		getInitialState: function(){
			return getCatalog();
		},

		render: function(){
			var items = this.state.items.map(function(item){
				return <tr><td>{item.title}</td>
					       <td>${item.cost}</td>
					       <td><AddToCart item={item} /></td>
					   </tr>
			})
			return (
				<table className="table table-hover">
				{items}
				</table>
			)
		}
	});

module.exports = Catalog;Lastly, we define our app-cart.js, which handles displaying our cart as well as the items within it.
~/flux/src/js/components λ vim app-cart.js/************************
*------app-cart.js------*
************************/
/** @jsx React.DOM */
var React = require('react');
var AppStore = require('../stores/app-store.js');
var RemoveFromCart = require('../components/app-removefromcart.js');
var Increase = require('../components/app-increase.js');
var Decrease = require('../components/app-decrease.js');
function cartItems(){
return {items: AppStore.getCart()}
}Like our app-catalog.js, we also define a method for getting the items within our cart through the cartItems method.
var Cart =
	React.createClass({
		getInitialState: function(){
			return cartItems();
		},

		componentWillMount: function(){
			AppStore.addChangeListener(this.onChange);
		},

		onChange: function(){
			this.setState(cartItems())
		},

		render: function(){
			var total = 0;
			var items = this.state.items.map(function(item, i){
				var subtotal = item.cost * item.qty;
				total += subtotal;
				return (
					<tr key={i}>
						<td><RemoveFromCart index={i} /></td>
						<td>{item.title}</td>
						<td>{item.qty}</td>
						<td>
							<Increase index={i} />
							<Decrease index={i} />
						</td>
						<td>${subtotal}</td>
					</tr>
				)
			})
			return (
				<table className="table table-hover">
					<thead>
						<tr>
							<th></th>
							<th>Item</th>
							<th>Qty</th>
							<th></th>
							<th>Subtotal</th>
						</tr>
					</thead>
					<tbody>
						{items}
					</tbody>
					<tfoot>
						<tr>
							<td colSpan="4" className="text-right">Total</td>
							<td>${total}</td>
						</tr>
					</tfoot>
				</table>
			)
		}
	});

module.exports = Cart;
Most of the code above should look familiar with the exception of the componentWillMount method. Our Cart Component needs to listen for change events from the catalog. This method will handle this by calling the onChange method, which in turn resets out state to the items we currently have in our Cart, which will in turn get re-rendered via render.
Wrapping up
If you’ve made it this far, congratulations! Go ahead and run gulp in the project root directory and open up dist/index.html. You will be able to add, remove and increase/decrease the quanity of items in your cart.